Moderator view:
The webinarroom
Updated May 4, 2026
As the owner, you are also the main moderator of your events. This means that when you enter your webinar room, you are automatically present as the moderator and have access to all functions. Once you appoint additional co-moderators, they will also have access to all functions within the webinar room. The main moderator and co-moderators are authorized to start the webinar. You will always find the start button in the top right corner of the webinar room.
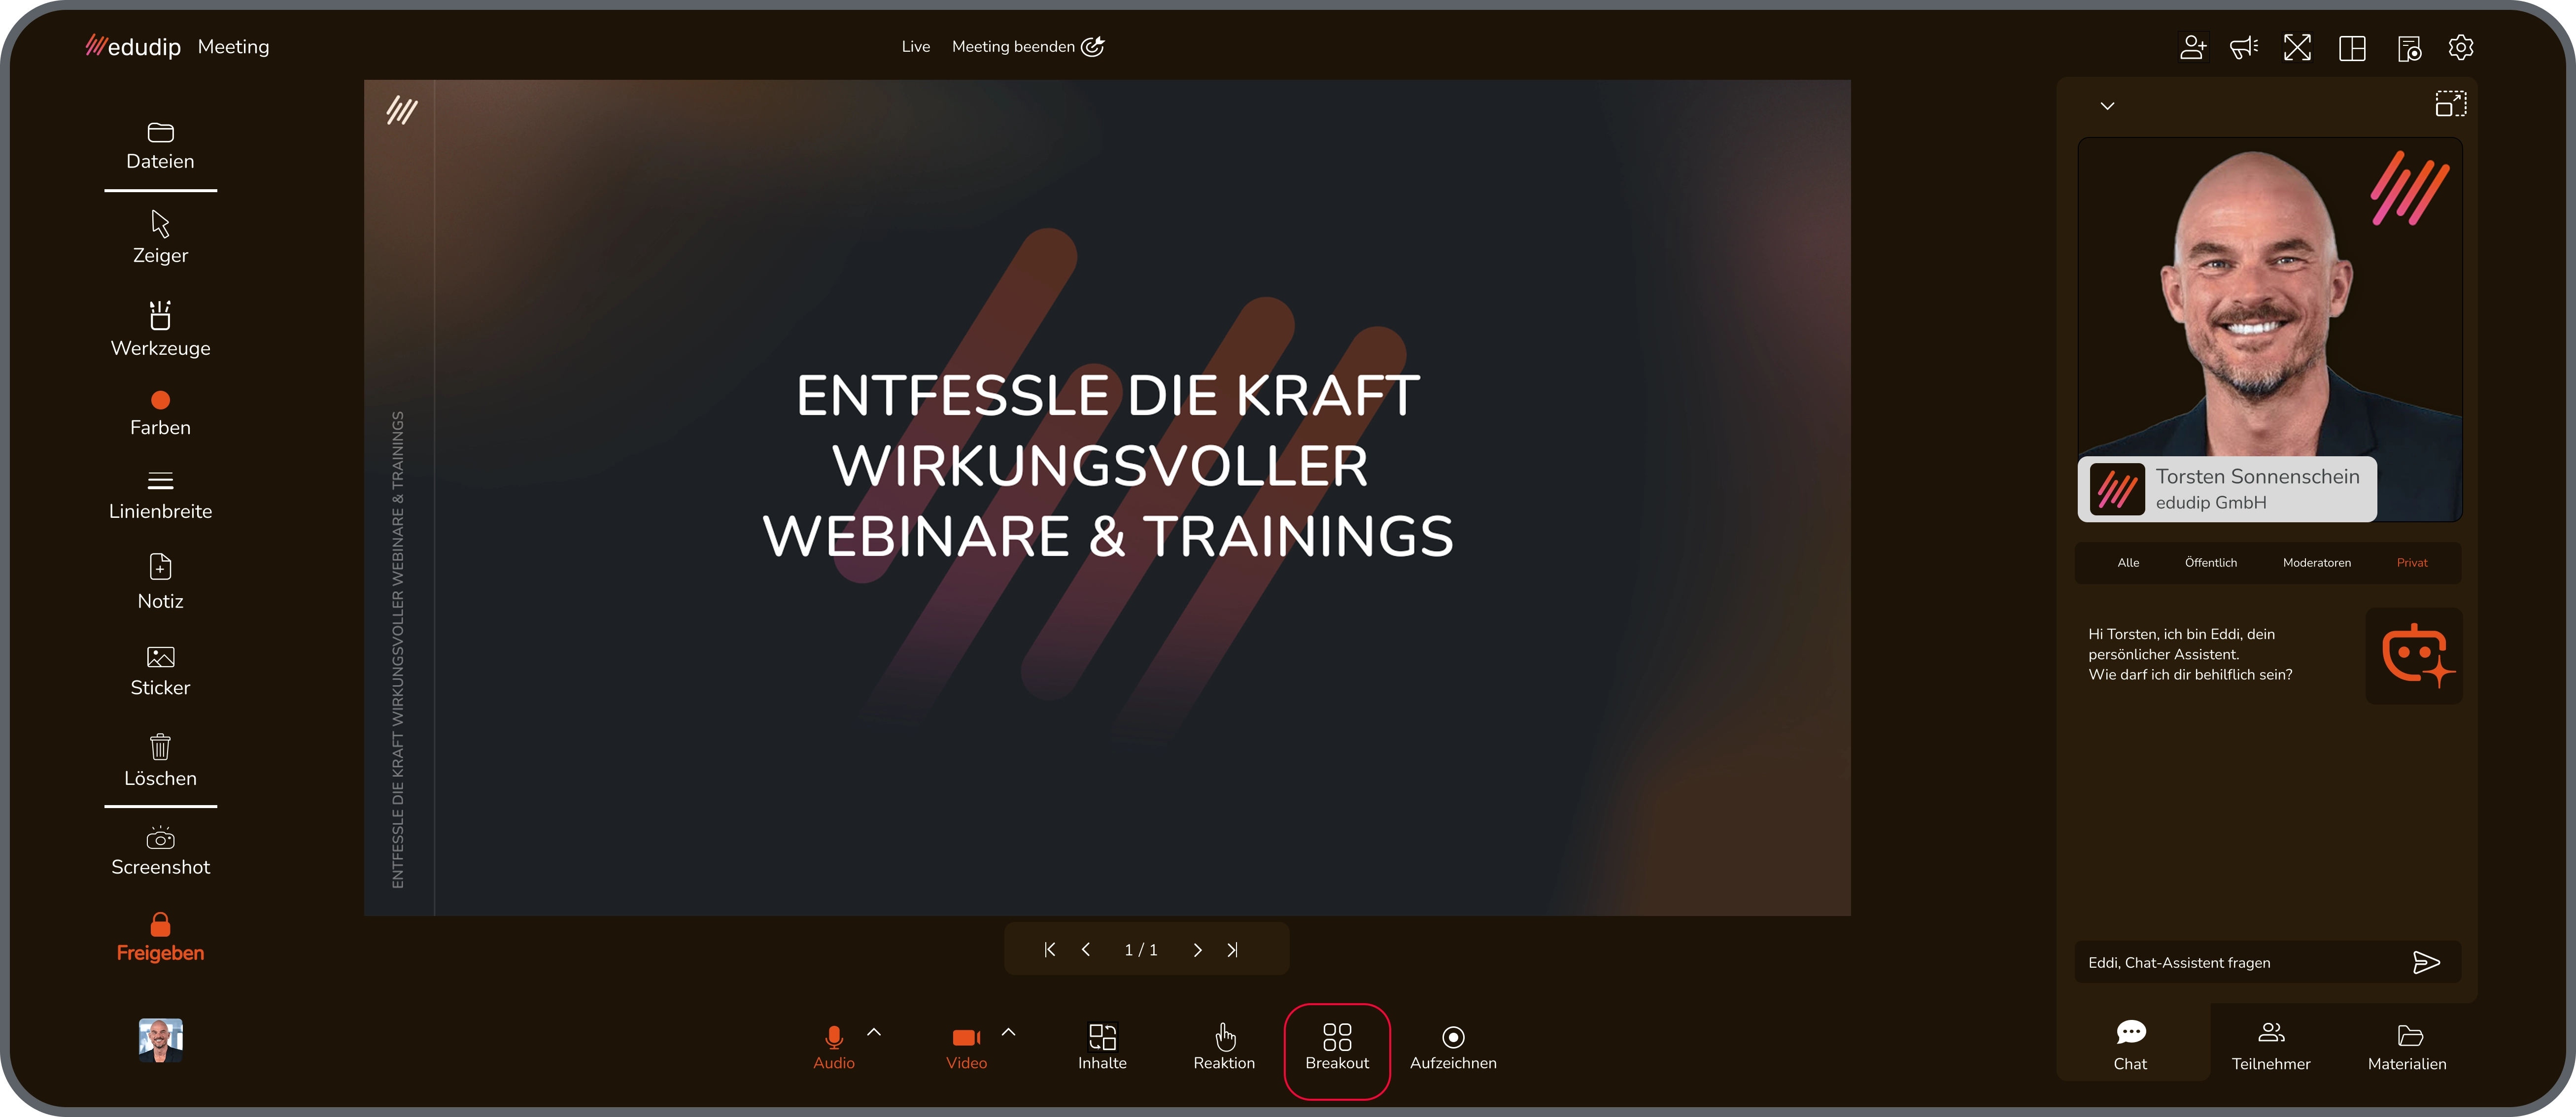
The various tools and drawing tools that can be used in the presentation view are placed compactly on the left side of the screen, the toolbar. All the other functions are located at the bottom of the screen.

The organization enables quick and easy switching between the various functions. Every time you switch functions, your participants also change views. However, that doesn't mean that your participants see when you're preparing a survey or a YouTube video, they just switch to the corresponding view and see the content as soon as you've started it.
If you do not want to start the webinar manually, the webinar will automatically start at the specified time and will be signaled to you prominently with a 10-second countdown.
The number of moderators, co-moderators and participants available to you depends on your booking subscription. The number of participants active at the same time and thus transmitted with video and sound was increased and set to 25+ (depending on the subscription selected).
The camera images of the presenters and active participants are placed at the top of the screen. The moderators are shown on the left side with names marked in color. On the right, there are camera images of the active participants. To activate audio and/or video transmission, the “Audio” and “Video” icons are available at the bottom of the screen. If the transfer is activated, the font of the icons is highlighted in red. Clicking again deactivates the transfer. Another way to spontaneously activate or deactivate audio transmission is to press the spacebar.
The eight views, or also known as main functions, are collected centrally at the bottom of the screen under the “Content” menu item.
The following views are available:
- Presentation view & whiteboard: In these views, you will find all functions related to the drawing area, and you can also upload documents. The tools, shapes and colors available so far, as well as the file upload, will now be on the left side of the screen in the toolbar.
- Select the folder icon when you want to upload new documents or switch to the artboard. To upload your documents, click “Upload file” and select the files you want from your computer.
- Select the slide preview to see your documents as a clear preview or to be able to switch back and forth between the various slides easily and quickly.
- Select the drawing tools menu to see the range of colors, shapes, and features. You can now use these to express yourself creatively on the drawing board or on your uploaded documents. To do this, first select the shape or function and then the color and line width. In addition to the option to draw, there are also various shapes and text input available. Simply click on the text icon to activate writing mode. Select a font color and click in the drawing or presentation area to open the text input field. Type in your desired text, choose the font size, click OK and place your text. If you want to empty the page and remove the added texts and drawings, simply use the trash can icon.
- Select the pointer icon to show your participant where your mouse pointer is. Once you have shared your whiteboard with your participants, you can determine whether the user's name should be displayed next to the laser pointer or not. While other features can be activated at the same time, the pointer must be disabled so that you can use the color palette options.
- To take a screenshot of your slide, click the camera icon and take a photo of your screen. This is then saved as a .png file in your download folder.
- Select the lock icon to activate and deactivate whiteboard sharing. By default, only you can use the whiteboard, i.e. the drawing area, to draw at first. If you also want to give your participants the opportunity to get involved in drawing, click on the padlock to activate the drawing board for everyone. The color palette with all your drawing options is now available not only to you, but also to your participants. When you click on the padlock again, you deactivate this option again and therefore only you and any co-moderators are able to use the whiteboard.
- Screen sharing view: To activate screen sharing, click on the screen icon in the “Content” drop-down menu, which is located at the bottom of the screen. You can choose between sharing the entire screen, an application window, and a tab. If you want to share the entire screen, select it and then click “Share”. Your entire screen is now transferred, i.e. your participants see everything that happens on your screen. To stop both the full screen transfer and the transfer of an application window or tab, click “Stop sharing.” Please note that the screen sharing function is browser-dependent: For example, it is not possible to use it with Safari, as the technology is not supported by the browser. Furthermore, when using screen sharing in Firefox, the mouse pointer is not transferred.
- Video view: If you want to play one or more YouTube videos during your webinar, be sure to add them to your video list first. To add a video, simply open the desired video on YouTube, copy the YouTube link, then into the box “YouTube link or video ID” paste and on “Add video” click. Select the YouTube icon to play the video during your webinar. All you have to do is click on the video. Just click on the next video to switch to another video. End the video by clicking the box “End video” click on the one located in the middle of the YouTube video. When you change the view, the video automatically stops. If you’d like to share a local video from your PC, use the ‘Share local video’ button. Unlike on YouTube, this video isn’t saved in the room; it’s only displayed whilst it’s being streamed.
- Camera mode view: Use the camera view to change your viewing mode. By default, your camera image is shown in the top right corner. To be shown as a full-size speaker in the webinar room, select focus mode. If you are holding your webinar with more than one presenter, tile mode allows you to display the main presenter and up to 3 co-presenters in the webinar room. To end the transfer in focus or tile mode, simply exit the view. Meeting mode allows you to display moderators and active participants as tiles across the entire screen. To end the broadcast in Focus or Tile mode, simply exit the view.
- Survey view: Use the survey function and create your surveys before or even spontaneously during the webinar. To create a survey, select “Create a new survey”. Name your survey, ask a question, provide various answer options, and decide whether you allow multiple answers. If you have planned the survey in advance, save it using the Save button. Your participants do not see your preparations, but only see that you are in the survey view. Only when you go to “Start” Clicking will show your participants the survey they just created or selected. To end the survey and present the results to your participants, click on the button “Present results”. When you hit the button “End survey” choose, your survey is completed and the result is rejected without you presenting it to your participants.
- Chat view: Use the chat view to focus on the chat and display it across the entire size of the presentation area. As soon as you switch to another view, the chat appears smaller on the right side again.
- Collaboration view: The collaboration tool is a feature designed to make communication and cooperation between you as simple and interactive as possible. Under the ‘Collaboration’ menu item, you can work on documents together. This option is ideal for collaborative work within group projects. Once the group work is complete, the document can be saved and uploaded as a PDF to the main room to present the results and discuss them with the other group members.
In addition to the main functions, there are other functions available on the bottom of the screen bar:
The breakout rooms are not in the top right corner as before, but are now hidden behind the “BR” icon on the bottom screen to the right of the “Content”.
If you open the breakout rooms, you will first end up as a moderator and participant in the so-called breakout dashboard. Here, as a presenter, you have the option to determine the number of breakout rooms, have your participants automatically distributed among them, or place them in the desired rooms using drag and drop.
Thanks to the clear view, you know exactly which participants are in which rooms. You can also determine whether the group members can move back and forth independently in the various group rooms or should remain permanently assigned to a group room. In the respective group rooms, you have the option of providing uniform or individual documents for each group room. To release documents for all breakout rooms, click on the “Distribute Documents” button in the top right corner of the Breakout Dashboard and then select the desired documents. Note that you can only release documents that you have uploaded in advance in the main room or when creating your webinar or training courses. If you want to release different documents for the individual breakout rooms, click on the document icon in the respective group room in the breakout dashboard and drag and drop the desired documents into the “Approved Documents” field.
As a presenter, you can enter the breakout rooms at any time to assist your participants with group work. Once the group work has been completed, you can either use the “Get all back” button or only the participants from specific groups back to the main room. To announce the end of group work or to communicate across rooms during group work, it is advisable to use the call-to-action function, which is available via the megaphone icon in the top right corner.
In the webinar and meeting room, as a presenter, you have the opportunity to use the call-to-action to present content, information and links.

The call-to-action button is located at the top right of the screen. With one click, the input mask opens and you can now insert and edit your text and/or link. There are various formatting options available to you.
#Dieser text is displayed as a headline
*This text is shown in italics*
**This text is marked in bold**
URLs automatically become clickable links: www.edudip.com
Texts can also be linked: [click here] (www.edudip.com)
The input mask can only be seen by you. As soon as you have opened the input mask, the call-to-action button will only be greyed out to potential co-moderators. To view your text from the participants' perspective, please click on “Preview.” If you want to place the call-to-action publicly in the webinar or meeting room for everyone, click “Show call-to-action.”
If the call-to-action is displayed in the room, participants have the option to close it with one click. To create a new call-to-action, you must reopen the input mask. There is currently no option to store the call-to-actions in advance, so we recommend that you complete your formatted text before the start of the webinar so that you can simply copy it into the input mask if necessary. Please note that the call-to-actions are not displayed in recordings.
Of course, as a moderator, you - just like your participants - have access to the chat function. The chat is located on the right-hand side of the webinar room, next to the participant list. Here, you can communicate in writing with your participants and co-moderators by typing your message into the provided field. For greater clarity, the chat has been divided into four tabs. The individual message tabs - ‘All’, ‘Public’, ‘Moderators’ and ‘Private’ - provide a better overview of the individual channels and ensure that unread messages are immediately visible and that no messages get lost.
The ‘All’ tab contains the entire conversation for the event. The ‘Public’ tab contains all messages that are visible to everyone (i.e. to every participant in the event). The ‘Moderators’ tab displays messages that participants or co-moderators have sent to you. Both the messages and your replies in this tab can only be read by you and your co-moderators. By clicking on the three dots to the right of the message, you can reply privately to the person, delete the message or mark it as resolved. The ‘Private’ tab contains private conversations. If a participant messages you privately, your reply will only be visible to the sender of the previous message. Using the arrow in the top-left corner, you can ‘collapse’ the chat so that it no longer takes up any space on the workspace and the focus is now fully on the presentation. Important: This setting only affects your own view and does not control the view of other participants.
The participant list is located next to the chat box on the right-hand side of the screen. In the participant list, you can see who is attending your webinar and how many participants there are. If you click on the three dots next to a participant’s name, you can activate that participant, i.e. enable their video and audio feed. You can also appoint them as a (co-)moderator, thereby granting them the same rights and functions as you. Finally, you can send the participant a private message or remove them from the event. Please note that the removed participant will no longer be able to join the current event.
Didactics support, whenever you need it. Eddi is your personal assistant, actively helping you to create interactive and engaging webinars. Eddi is located at the bottom of the screen between the settings and the participant list. Eddi not only brings structure to your webinar, but also a touch of fun and dynamism. With his interactive energisers, he ensures genuine participant engagement; there are currently three energiser games available: the Word Carousel, the Picture Mosaic and the Step-by-Step Energiser.
The media library, also known as ‘Materials’, is a central area within the edudip webinar room. Moderators can upload and manage files there and share them with participants as required. You will find the media library in the bottom right-hand corner of the webinar room via the ‘Materials’ folder icon. This area is not initially visible to participants. As a moderator, you can upload new materials using the upload icon. To do this, click on the icon and then select the desired files from your computer. To help you keep track of your materials, even when there are many files, you can search, filter and sort them. Using the search field, you can quickly find specific files using relevant keywords. Additionally, you can filter the materials by categories such as videos, images, presentations, whiteboard, others or word carousel. If several moderators have uploaded files, you can also filter by author. The files can also be sorted by various criteria, such as filename, number of downloads, file size, creation date or last updated. The sort order can be set to ascending or descending.
Share files with participants
Next to each uploaded file, you will see key details such as the file name, format and file size. You can use the eye icon to specify whether a file should be visible to participants. Once at least one file has been shared, the ‘Materials’ icon will also appear in the bottom right-hand corner of the webinar room for participants. Participants can then view and download the shared files.
File management via the three-dot menu
To the far right of each file, you will find a three-dot menu. Clicking on it opens further options:
- Download: You can download the file to your own computer.
- Share in chat: This feature shares the file name, a preview image and a link to download the file in the public chat. Please note that this feature works regardless of whether the file itself has been shared with the participants or not.
- Delete: You can remove the file from your media library.
- Edit: Here you can change the filename of the uploaded file.